Max, Max and Max

3dsmax 2023 brings a feature which will make IT and pipeline technical directors cry… but for this time for good reasons!

Max can now be run from anywhere… what does this mean…

Previously… If you want to try and test out a 3dsmax update, you had to upgrade your max…. if you wanted to test this on your farm… you’d have to roll it out there too… using software management tools to install/uninstall is slow, unreliable and a pain to rollback if something isn’t working. We’ve all been there, felt the pain of downtime.

Jan 2023 Edit: There was one magic ENV that needs to be set to make this work properly… but you can just set this across all your machines.
ADSK_3DSMAX_ENVVAR_TOKEN_SUPPORT = 1

Now however you can do something like this… (this also works with max2022.3 but some of the ENVs aren’t implemented so you need to handle things slightly differently)

Install 3dsmax 2023 to;
c:\3dsmax\3ds Max 2023
and when 2023.1 inevitably comes out you’ll be able to install that to…
c:\3dsmax\3ds Max 2023.1
urghhh but Dave I have to then install all my plugins and scripts twice…. aha… nope, Autodesk listened to us nerds… you can set some ENVs on your machine….

ADSK_3DSMAX_PLUGINS_ADDON_DIR = C:\3dsmax\%ADSK_3DSMAX_MAJOR_VERSION%\Plugins

ADSK_3DSMAX_SCRIPTS_ADDON_DIR = C:\3dsmax\%ADSK_3DSMAX_MAJOR_VERSION%\Scripts

ADSK_3DSMAX_STARTUPSCRIPTS_ADDON_DIR = C:\3dsmax\%ADSK_3DSMAX_MAJOR_VERSION%\Scripts\Startup

(note %ADSK_3DSMAX_MAJOR_VERSION% is only in max 2023+, more details in Changsoo’s excellent post https://cganimator.com/unofficial-3dsmax-whats-new)

And then you can put your plugins and scripts in those folders and magic the plugin will load in both versions. (or put your plugins in a network location for even more sharing fun).

If you’re using modern plugins which use the folder; C:\ProgramData\Autodesk\ApplicationPlugins

Then these will load automatically with whatever version of max you use!

Oi Itoo Software!! Get ForestPack and Railclone using that spec please!! ASAP!

Now even Itoo Softwares Forest Pack and Railclone are in this format!

OK, even better news… if you want to give everyone max 2023.1 when that comes out you can install it once… zip it up, or copy it to a network location and then just copy down to that folder above… So… if you’ve got pipeliney people they can automate that with pipeline tools and set ENVs automatically…

With a few modifications to Deadline you can also get it working with the above too so you can send jobs to two different versions of max, it would be great if Thinkbox supported that too, so go bug them! They’ll need the ability to pass a custom location for 3dsmax in the Max Job Properties to 3dsmax.py, there is an ENV ADSK_3DSMAX_ROOT which they can pick up easily.

Why am I so excited about this? Because this allows multiple projects at one studio to use 2 different versions of max that might be only a minor version apart. Previously most of the big studios I talked to would wait until the final update was released for a max version before rolling it out because they didn’t want to update max mid-project… as rolling back is a pain… this could leave people on old versions of max for years…. missing out on bug fixes and updates… Autodesk will get more feedback faster from bigger studios now which can only be a good thing!

Can I just copy the 3dsmax install down to a computer which doesn’t have any other version of max installed? Meh… kind of… you need to make sure that all the necessary runtimes are installed like VCRedist2015-2019, these are in the installer files in the ‘3rdParty’ folder if you want to have a look and most will probably have already been installed from other applications, and then you need to either set up Thin-client licensing, or install the Autodesk licensing tool and then register the 3dsmax product with a special command. Here’s the details…

In the installation files, install this on every machine…
{max_install_files}\x86\Licensing\AdskLicensing-installer.exe

And then the following command run to license/register max or it’ll throw a licensing error on launch.

C:\Program Files (x86)\Common Files\Autodesk Shared\AdskLicensing\Current\helper\AdskLicensingInstHelper.exe" register --prod_key 128O1 --prod_ver 2023.0.0.F --config_file "{max_install_files}\x64\max\3dsMaxConfig.pit" --eula_locale US --lic_method NETWORK --lic_server_type SINGLE --lic_servers {yourlicenseserver}

The prod_key value for max 2022 is 128N1, for 2024 it’ll be 128P1, the prod_ver doesn’t seem to matter as much, the pit file is in the installation files so put it on the network somewhere. It would be awesome if in the future these values for license server could be picked up by an ENV automatically so we didn’t have to do this step.

Can you run 3dsmax directly from a network location after doing this? Yish… It worked but it occasionally would stall for me loading up, someone find out why… so I ended up copying down to local drives instead, but that would have been even less of a pain to deploy!

With a few pipeline tweaks, mods to Deadline and some organisation, you can have a new version of max rolled out to an entire company/render farm in a matter of minutes now with the ability to roll back on a switch too. Welcome to the 21st Century Max Users!

Congrats Autodesk, you did something right for once!

Posted in 3dsmax | Leave a comment

Projecting Camera Maps

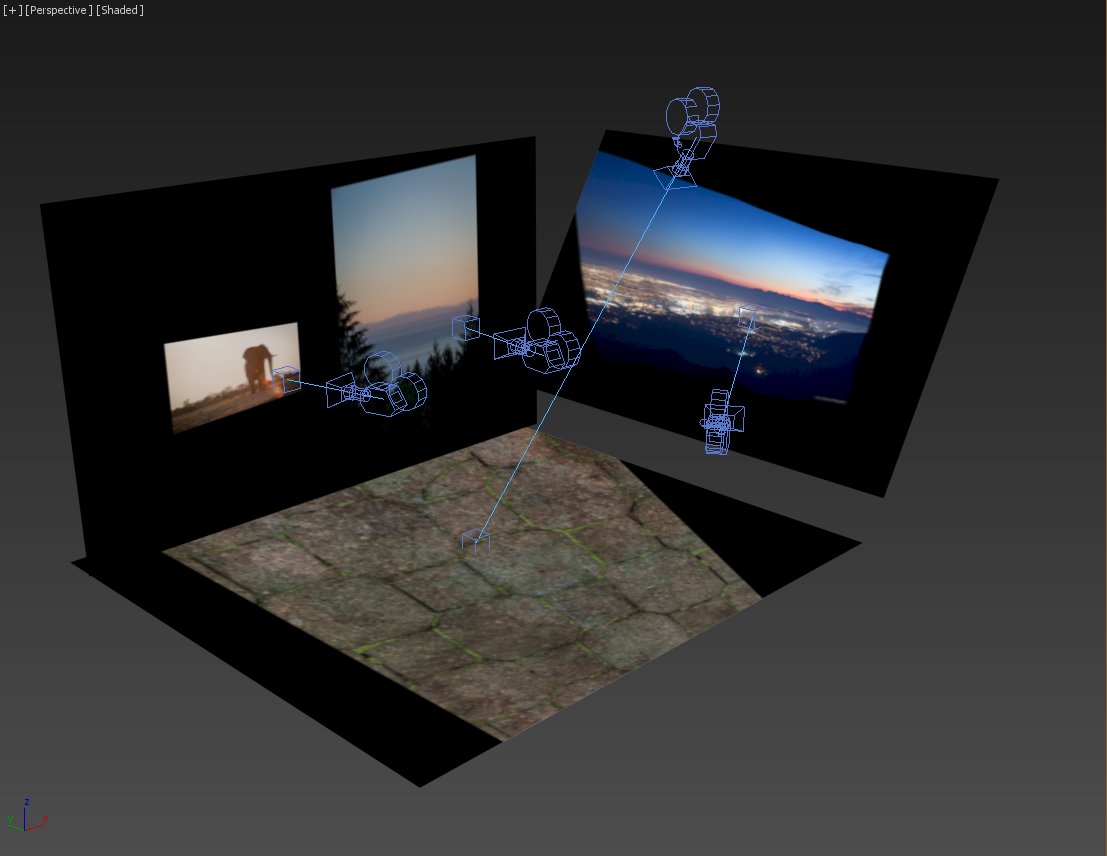
By default in standard 3dsmax the Camera Map Modifier has a projection aspect ratio the same as the camera/render resolution, this isn’t good if you need to project a portrait image on a landscape render. Whilst there are plugins/MCG/OSL solutions to this, my solution works on standard max, with no plugins needed to reload the scene. It even works on CameraMapPerPixel too.  It simply works by scaling the camera based on the render resolution aspect to match the texture’s aspect ratio.

The script is quite clever and will automatically find a texture on the object that the camera-map is projecting with that is on the same channel ID.  So all you need do is select the camera.  If you need to change the aspect ratio of your render just re-run this script to fix all your projections.

Get it here on ScriptSpot.

http://www.scriptspot.com/3ds-max/scripts/camera-map-ratio

ratio_fixer

Posted in 3dsmax, MaxScript | Leave a comment

SME: Slating the right Nodes

Whilst working on my next tool I hit a rather large stumbling block. Getting the selected nodes in the Slate Material Editor only passes you string names.  The Problem with the SME and 3dsmax in general is that maps/materials can share the same names, and to get the selected materials from the SME we need to reference by name… this can easily cause problems with complex material sub-trees where sub-maps and sub-mats have the same name, or you have two material trees in your SME view which have the same named (but different) materials in their graphs.

Below is a function which does a dirty work-around of this by temporarily giving every map a unique name, then collecting the selection of mats/maps values from the SME, then renaming back to original names. Our collection will still be valid as we’ve now got a pointer to materials not string names.

fn getSelectedFromSME =
(
–Get all the node names in SME
smeNames = (for i = 1 to (sme.getView (sme.activeView)).GetNumNodes() collect ((sme.getView (sme.activeView)).getNode i).name)

–let’s see if we have clashing material/map names in the SME before we bother doing dirty tricks
if (makeUniqueArray smeNames).count == smeNames.count then
(
–If no clashes we can use the standard method for getting the selected nodes by looking at the trackview and finding the name
selNodes = (sme.GetView (sme.activeView)).getselectednodes()
selectedNodesNames = for o in selNodes collect o.name

selectedMaps = #()
for i = 1 to trackViewNodes[#sme][sme.activeView].numSubs do
(
if (superclassof trackViewNodes[#sme][sme.activeView][i].reference == textureMap or superclassof trackViewNodes[#sme][sme.activeView][i].reference == material) and finditem selectedNodesNames trackViewNodes[#sme][sme.activeView][i].reference.name != 0 do
append selectedMaps trackViewNodes[#sme][sme.activeView][i].reference
)

selectedMaps
)
else
(
–if not, we need to work out which are nodes which have the same name, create a list of these
allItems = makeUniqueArray smeNames
for i = 1 to allItems.count do (deleteitem smeNames (finditem smeNames allItems[i]))
clashNames = (makeUniquearray (smeNames))

–we’ll use this array to keep a record of which we changed
changeID = #()

–loop through all the nodes in the SME
for i = 1 to trackViewNodes[#sme][sme.activeView].numSubs do
(
–if we find one which has a clashing name…..
if (finditem clashNames trackViewNodes[#sme][sme.activeView][i].reference.name) != 0 do
(
–add it to our change ID with the index and original name
append changeID (datapair v1:i v2:trackViewNodes[#sme][sme.activeView][i].reference.name)

–set the name to a unique name using what will hopefully be a safe name
trackViewNodes[#sme][sme.activeView][i].reference.name += (“_________________________________” + i as string)

)
)

–Now we can get the selected names and all names will be unique
selNodes = (sme.GetView (sme.activeView)).getselectednodes()
selectedNodesNames = for o in selNodes collect o.name

selectedMaps = #()

–now we loop through the trackView SME nodes and find the references using the names (as all names are now unique)
for i = 1 to trackViewNodes[#sme][sme.activeView].numSubs do
(
if (superclassof trackViewNodes[#sme][sme.activeView][i].reference == textureMap or superclassof trackViewNodes[#sme][sme.activeView][i].reference == material) and finditem selectedNodesNames trackViewNodes[#sme][sme.activeView][i].reference.name != 0 do
append selectedMaps trackViewNodes[#sme][sme.activeView][i].reference
)
–this returns an array of maps/materials values – at this point the names have been modified but now we have a pointer to the map/mat it doesn’t matter any more
selectedMaps

–now we loop through our change ID and change them back to original (clashing) names so the user won’t freak out
for o in changeID do
trackViewNodes[#sme][sme.activeView][o.v1].reference.name = o.v2

–Our array of materials/maps values have the original names but we’ll have the correct mat/map values in our array.
selectedMaps
)
)
getSelectedFromSME()

Posted in 3dsmax, MaxScript | Leave a comment

Intricacies of 3ds Max Part 1

Half of what I know isn’t just how to solve a problem, but why that problem exists and when we are just using work-arounds to get around problems.  Here are a few examples which may seem illogical at first, but are important to understand.

Object Names are not unique…

Objects in 3dsmax don’t need to have unique names, this can make certain things a bit complicated, like if using the getNodeByName() function, it will only return one occurrence of the object, and I’ve noticed that the one it picks can be different in local and slave mode.  There is an extra parameter for getnodebyname “thisName” all:True which will give an array of all the objects with this name.

When you are merging objects in to the scene, either by script using mergeMaxFile or using the dialog when you have duplicate object names you have to choose what you do….. Either:

  1. Rename the object – So you can merge in your object with a new name.
  2. Skip the object – Don’t merge your object in to the scene
  3. Merge the Object – Merge the object in without changing any names creating a conflicting name.

So if 3dsmax doesn’t work on object name basis to identify objects how does it actually work? Well it’s what’s called the handleID of the object.  You can see any handleID of any object by querying it’s handle property.  It’s not something exposed to the UI, and it doesn’t persist with the object when it’s merged in to another scene. You can’t have two objects with the same handle so when merging a file in, all the handles of the merged objects will be += the number of objects in the scene before merging.

Sorting names alphabetically doesn’t quite do what you expect

The sort() function allows you to sort a list of strings into alphabetical order.. Great says the artist, I know all about sorting alphabetically, I learned that at primary school.  Wrong.  In the computer world, objects are sorted slightly differently.

Suppose I gave you this list:

#”(“elephants”,”are”,taking”,”back”,Elephant”,”Tangerines”)

So the ‘logical’ way of sorting this list would result in….

“are”,”back”,”Elephant”,”elephants”,”taking”,”Tagerines”

But alas in 3ds Max it’s

“Elephant”,”Tangeringes”,”are”,”back”,elephants”,”taking”

This is because it’s sorting based on something like byte size order where ‘E’ is before ‘a’. You may have seen this in the scene explorer in max already. And unfortunately/fortunately the sort function returns the same result.

Other intricacies of sorting to be aware of are with differently formatted string numbers.

myAR = #(“2”,”1”,”10”,”11”)

myAR = sort(myAR)

Will return:

#(“1”,”10”,”11”,”2”)

So to avoid this you will need to pass these items to an Integer array and then sort that and then put the values back to strings.

(for n in (sort(for o in myAR collect o as integer)) collect n as string)

Posted in 3dsmax, Lessons, MaxScript | Leave a comment

Interactive Rollout Builder for 3ds Max

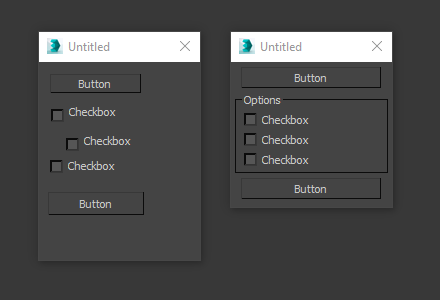
For any tool to be truly useful it needs to have an interface. The quality of your interface might not seem like the most important thing but to an artist there’s a quality level that comes through from the neatness and usability of the tool which makes the artists trust it more.  Compare these two interfaces, they do the same function but which one do you think was written by the coder with the better attention to detail and may therefore have less bugs?

layouts

Creating rollouts with maxscript can be done two ways.  The Visual MaxScript editor may seem like the obvious way to create tools, you can drag and drop controls and neatly align the controls.  Unfortunately it isn’t always particularly acurate when you then launch your script. Particularly with spinners, and any other controls or properties it doesn’t know about won’t be dealt with correctly  Whilst this can be a good starting point for learning which controls exist and what their properties are I don’t believe it really teaches the best way to lay out your controls.  The problem comes when you want to add something in to an existing UI you need to shuffle everything around.  

The way I write rollouts is to list the controls out and use the ‘across’, ‘offset’ and ‘align’ properties of the control to get a nice neat layout.  Tweaking the offset parameter in particular can allow you to get things exactly in to line.  But what ends up happening is lots of (Ctrl+E) bashing to test the UI.

RolloutCreator_UI

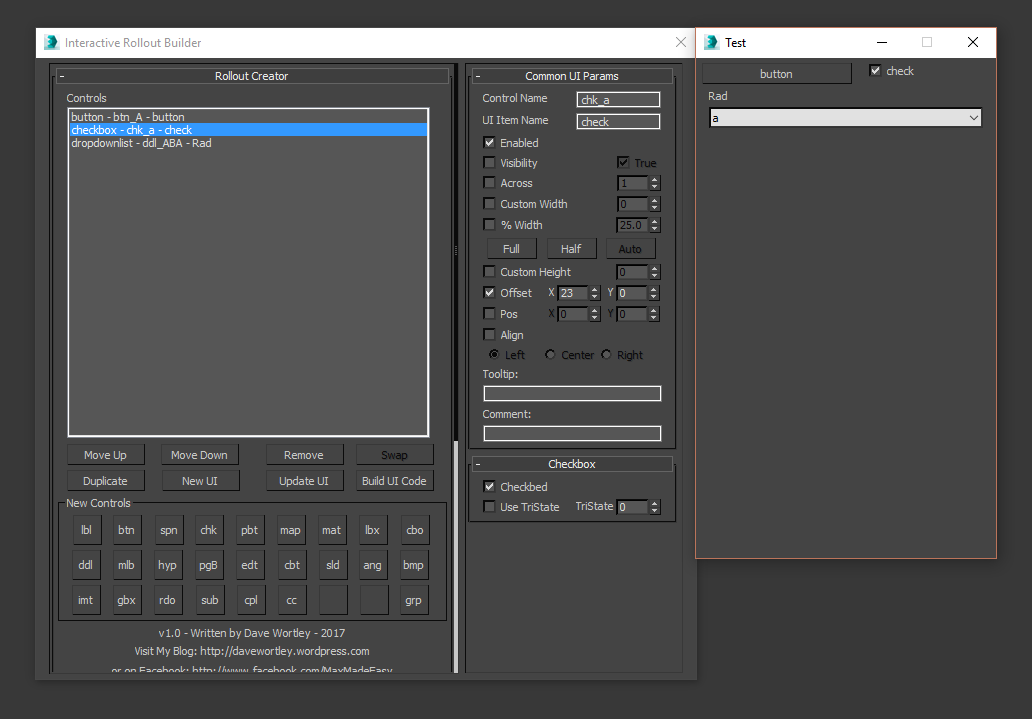
This is where my new tool comes in,  a maxscript based rollout generator which works on using the neater layout controls rather than exact positioning and allows you to quickly build professional looking UI, and add in extra controls later on.

It works interactively so you can modify controls and see the exact response in a rollout next to the window.  As this window is built by maxscript it is exactly the result you will get when you run the UI code in your own tool.

You can paste rollout code in and load it into the editor but at the moment it has limited functionality as I need to find a way to pass the code through an interpretator to pass it.

Check out the video here:

Even if you aren’t a maxscript writer you could use this tool to create the interface for a tool that you want someone else to write.

Download it here:

http://www.scriptspot.com/3ds-max/scripts/interactive-rollout-builder

Posted in Uncategorized | Leave a comment

Lesson 15: Enumeration Stations….

Sorry this blog has been neglected… Facebook makes things much easier to share…

In some other….. ‘proper’… coding languages you have a function called Enumerate…. this allows you to iterate through an array and not only get the value but also index of the item too….. like this… Who even uses Python??

In a traditional maxscript loop you’d need to use the index of the array….

myArray = #(“a”,”b”,”c”,”d”)

for i  = 1 to myArray.count do
(
format “#%: %\n” i myArray[i]
)

or you had to put a counter outside of the array

myCounter = 0

for o in myArray do
(
myCounter += 1
format “#%: %\n” myCounter o
)

But we can enumerate if we create a function to do this for us.. I wrote this one which uses the rarely used DataPair value type…. DataPair Value Type from Maxscript Help

Data pairs are actually quite useful, especially as you can label the values… so instead of reading o.v1 and o.v2 we can read o.index and o.value… a much more pleasant way to read our code…

fn enumerate ar = for i = 1 to ar.count collect (DataPair index:i value:ar[i])

myArray = #(“a”,”b”,”c”,”d”)

for o in enumerate(myArray) do
(
format “#%, %\n” o.index o.value
)

Posted in 3dsmax, Lessons, MaxScript | Leave a comment

Optimising Scenes by Reducing Objects

One of the most efficient ways to optimise a scene in 3dsmax is to cut down on the sheer number of objects in the viewport. I’m not talking about deleting object, just merging objects together to one mesh can seriously improve the redraw rate and improve the handling with the Scene Explorer. It currently seems to struggle above 8000 objects regardless of polygon count. Often a scene that has come from CAD might have a crazy amount of helpers, you can delete a lot of these helpers to speed things up right away, and there’s way to strip down a hierarchy to a certain depth level so you don’t have 20 helpers for each piece of geometry.  Finding lots of similar objects that could easily be represented as one object is a nice way to improve speed.

Attaching Objects in 3dsmax is something that is slooooowww…….. using the built-in tool in 3dsmax it can take hours to attach even just a hundred objects. A few years ago there was a maxscript challenge thread on CGTalk to attach objects together as efficiently as possible. There were some very good solutions, and like any good coder, I borrowed the one I found best for me. Written by Tyson Ibele, it’s called Cluster Attach, it’s very easy to make this a macroscript and use it instead of the built-in attach button in Editable Poly.

Fast Attaching Methods

I find myself using this code all the time…

function clusterAttach objArr =
(

j = 1
count = objArr.count

undo off
(
while objArr.count > 1 do
(
if classof objArr[j] != Editable_Poly then converttopoly objArr[j]

polyop.attach objArr[j] objArr[j+1]
deleteItem objArr (j+1)

j += 1

if (j + 1) > objArr.count then j = 1

)
)
return objArr[1]
)

To call the function you can use this on an active Selection.

clusterAttach (selection as array)

Here’s a real-world solution which can help when say you get a file which has a load of stitches as individual objects rather than just one object for all the stitches.  It’s assuming those stitches are at least linked to a helper that define a set of stitches. If not, you’ll have to manually select them and run the code above.

–find all objects which have a child object with the name ‘stitch’ in its name.
for o in objects where o.children.count != 0 and matchpattern o.children[1].name pattern:”Stitch*” do
(
–merge all the children of our object
myObj = clusterAttach (for c in o.children collect c)
–reset the
myObj.parent = o

)

Or another one where maybe we want to find objects that have loooooads of children…

for o in objects where o.children.count > 500 do
(
–merge all the children of our object
myObj = clusterAttach (for c in o.children collect c)
–reset the
myObj.parent = o

)

Posted in 3dsmax, MaxScript | Leave a comment

Getting Mapped

Ok I admit it, I’m trying to help people learn maxscript and occasionally there will be things I don’t understand, often the process of writing out a blogpost helps solidify my knowledge and makes me ask the question of whether I actually know what I’m talking about (which I hope is most of the time by now!).

One thing that stumped me for ages and I just didn’t use, because I didn’t quite understand the why and where you would need it was mapped functions.  I saw a few examples and looked it up in the help but it didn’t seem to make a load of sense. It’s so different from a normal function that I was a bit lost.

A little while ago I looked at mapped functions again and now thanks to using MCG I’m familiar with the term ‘Map’, and I get how in MCG you have an array you map it with a function and the function gets run on each element in the array…. but hang on… maybe that’s how mapped functions work.. aha it is!

So here we go, as simply as I can make it, a mapped function  that changes the wirecolor of each item in the array that it gets passed.

mapped function testMe x =
(
x.wirecolor = (color 0 0 0)
)

a = selection as array

testMe a

Simples hey!? It’s just like saying for o in myArray do o.wirecolor = (color 0 0 0) etc….

I should have been using this a long time ago…. and will start using it more now.

Posted in MaxScript, Uncategorized | Leave a comment

Return of the Auto back

Autoback is one of those features we love to hate… we love it when it saves our ass, we hate it when it interrupts what we are doing.  One of my main pains is when you open the autoback, you have to go through a resave it in the right place.  Someone asked me why it can’t know where to go back to so I thought I’d write a little script to do just that!

–Declare a persistent global which will stay with the file when we open it
Persistent Global g_OriginalFilePath

–It’s good practice to remove any callback scripts before adding new ones
callbacks.removeScripts #filePostOpen id:#dw_tools
callbacks.removeScripts #filePostSave id:#dw_tools

–lets make a new function which we will call using the callbacks
fn restoreFile =
(
–If the filepath of our maxfile matches our autobackup we know we’ve got an autoback file!
if maxfilepath == (Getdir #autoback) then
(
MessageBox “Please resave this autoback file in the original folder.” title:”God bless autoback!” beep:true

–if we’ve got an original path then bring up a save max window with the old path
if g_OriginalFilePath != undefined do
(
newFileName = getMAXSaveFileName filename:g_OriginalFilePath
if newFileName != undefined do saveMaxFile newFileName
)
)
else
(
–If not then we need to update the path so that it’s the latest file we’ve opened/saved
g_OriginalFilePath = maxfilepath + maxfilename
)
)

–Add a callback for opening / saving files to store our filepath and check when opening/saving
callbacks.addScript #filePostSave “restoreFile()” id:#dw_tools
callbacks.addScript #filePostOpen “restoreFile()” id:#dw_tools

Super simple, and will probably save a couple of hours a year for each max artist. All you need to do is put that in a maxscript file in your startup scripts folder which can be found either:
C:\Program Files\Autodesk\3ds Max 20xx\scripts\Startup
or
C:\Users\Sherlock.Holmes\AppData\Local\Autodesk\3dsMax\2016 – 64bit\ENU\scripts\startup

Posted in 3dsmax, MaxScript | Leave a comment

Maya – Max: Why doesn’t 3dsmax have a Shape Node?

If you’re coming from Maya  to 3dsmax, or you’re learning Maya and getting confused as to why in Maya there are Transform and Shape node and in 3dmax it doesn’t look like there are… here’s a bit of a explanation, as both of them work the same way….

3dsmax has each object as one node in the scene… there is a baseObject property for each node which is where the class of the node is assigned as an object, this is effectively your shape node. When you create an scene-object, you tell 3dsmax what class of object you want to create by clicking on a ‘Plane’, or ‘Teapot’ for example. 3dsmax creates a ‘node’ object in the scene and then creates an instance of this class and assigns this object to the baseObject property of the scene-object.

Looking at the command panel in 3dsmax, the modify panel is effectively the shape node, the controller, hierachy and display tabs are all for the ‘transform node’ properties.

You can change what an object actually is in 3dsmax by assigning a new maxObject to baseObject property.  Create a Box in your scene and then run this line of code…

$.baseObject = (createInstance Teapot())

Ok so what is this baseObject property? When you use the commonly used*…

classof $

You are actually doing….

classof $.baseObject

*Thanks to Paul Neale for pointing out that classof $ returns the class of the object given any modifiers changing say from a spline to geometry using say the sweep modifier.

When maxscripting, a max node inherits all the properties of the baseObject MaxObject.
example:

$Sphere001.radius = 50

Where as properties such as:
.renderable
.primaryVisibility
.visibleToReflection
.material
.transform
are on all objects in 3dsmax regardless of their class

Properties of the maxObject, such as in an example of a sphere….
.radius
.segs
are unique to the class that is associated with the node as specified by its baseObject Class.

You can use the baseObject property to access these properties as well..

$Sphere001.baseObject.radius.

When you use getClassInstances it returns an array of all the instances of the class but not actual objects, so you have an array of all the maxObjects that are in the ‘baseObject’ properties slots for all the objects in the scene.  To get from this baseObject to the actual node you can use the reference system to get the dependent nodes, as one maxObject may be shared between multiple objects. When objects are instanced in 3dsmax each node is unique but the baseObject property is shared between the instanced nodes.

Create three VRayLights in your scene (or any other kind of object)

>>> myObjs = getClassInstances (VRayLight)
–returns….
(VRayLight, VRayLight, VRayLight)

See how it list 3 VRayLight types but it’s not pointing to VRayLight001 for example. This means using;

myObjs[1].invisible = true

works… but if you were to try this…  you’d get…

>>myObjs[1].position
— Unknown property: “position” in VRayLight

That’s because we’ve got an array of maxObjects not scene objects so we are querying the baseObject rather than the Object itself in the scene. We can get the Object my using refs.dependentNodes.

>>>refs.dependentNodes myObjs[1]
–returns
#($VRayLight:VRayLight001 @ [21.382523,52.673576,0.000000])

Take VRayLight001 in your scene and clone it 4 times as an instance, re-run the following code….

>>>myObjs = getClassInstances(VRayLight)
#(VRayLight, VRayLight, VRayLight)

See how we still get only 3 maxObjects returned?

>>refs.dependentNodes myObjs[1]
–returns 5 objects now.
#($VRayLight:VRayLight007 @ [252.584503,52.673576,0.000000], $VRayLight:VRayLight006 @ [164.925598,52.673576,0.000000], $VRayLight:VRayLight005 @ [77.266678,52.673576,0.000000], $VRayLight:VRayLight004 @ [-10.392235,52.673576,0.000000], $VRayLight:VRayLight001 @ [-98.051147,52.673576,0.000000])


Other places you can spot this Transform-Shape/BaseObject system in max is in the trackview when you look at an object (say Sphere001) you’ll see the Transform controller as subAnims and the “Object” (which should really be called ‘baseObject’).

In Maya these two are separate nodes… the Transform and the Shape Node.
Transform node = maxObject node
Shape Node = baseObject

In the outline you can expose the shape nodes and you can see the shapes as nodes, If you instance a node in Maya you’ll see that the transform nodes are unique but the shape nodes are the same.

In Maya Cmds there isn’t property inheritance like in max…. if you select the Transform node, the only attributes you can access are those on the Transform node. You have to get the shape node…. which isn’t as simple as just getting the value of a property of the transformNode….

selected_items = cmds.ls(selection=True)
if selected_items:
shapes = cmds.listRelatives(selected_items[0], shapes=True)
if shapes:
print shapes[0]

Using PyMel we can do this far more conveniently as everything is objects.

import pymel.core.general
selectedTransform = pymel.core.general.selected()[0]
selectedTransform.getShape()


Posted in 3dsmax, Lessons, MaxScript | Leave a comment